Flavian Hair

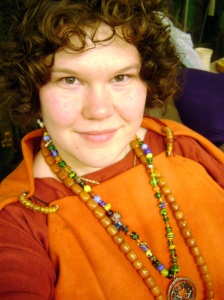
It’s been a while since I had anything worth posting on here, but I’ve been inspired lately and promised the folks over on the Romans of the SCA Facebook group that I’d share my results. My research lately has been looking a lot at the material culture and daily life of late 1st and early 2nd century Rome. I really loved the Flavian hairstyle I had at Birka and wanted to find a way to sport it more often. The difficulty is that I never had any skill at the girly arts. (Seriously, you’re talking to somebody who never mastered the art of the single self braid and who shaves their head every few years to stop having to deal with all that hair.) Putting my own hair up in rollers before an event is sadly beyond my patience level. Fortunately, I’m not the only one who either doesn’t have enough of my own hair or the time/patience to style it, and there were Roman women who agreed with me. Several wigs and hairpieces exist from ancient burials. There are two from the cemetery at Martres-de-Veyre alone.

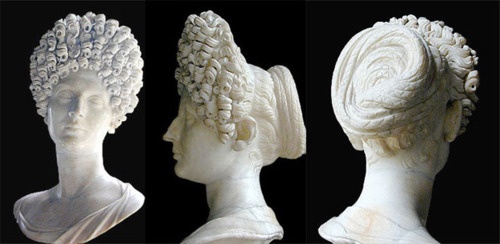
The Fonseca Bust, beginning of 2nd century AD. Capitoline Museums, Rome.

The Fonseca Bust, beginning of 2nd century AD. Capitoline Museums, Rome.

The Flavian hairstyle is one of my favorite historical fashion statements. It consists of giant towers of curls at the front and a wreath of braids at the back. The haircut needed to create such a style without adding anybody else’s hair is essentially a long mullet – short in front for frothy curls, long in back for all those braids. I usually save my hair every time I cut it short, so I had enough not-attached-to-my-own-scalp hair to make a hairpiece of braids over the winter. My own hair was short enough at the time to do all the curls, but now it’s growing out. I’m almost to the point where I can braid my own hair into the wreath at the back and need a false hairpiece for the front. So, I made one.

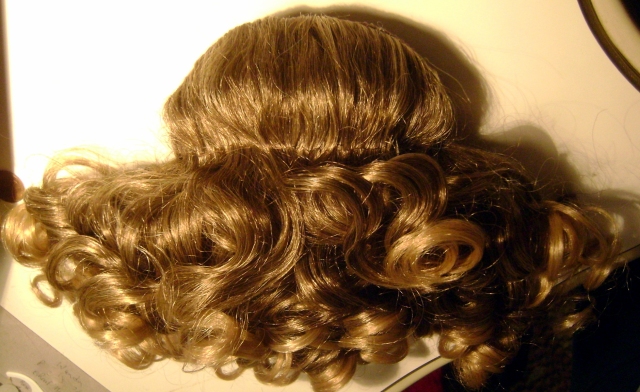
False hair designed to make a curly ponytail extension. It's not as fake looking in real life.

First, capture and skin one tribble… (False hair designed to make a curly ponytail extension. It’s not as fake looking in real life.)

The first step was a trip to a local beauty supply store, where I bemused the clerks by pulling out a hand mirror and a photo of the Fonseca bust I’d printed off and brought along. I was expecting to buy straight hair extensions and stitch and curl it myself, but I got really lucky and found a drawstring curly hairpiece designed to tie over a ponytail. (I bought a Vienna Harley in my own color; dunno why the website only shows it in black.)

At $15, it was a great option for the first attempt at this project – if it worked, wonderful; if I messed up, I could still afford a second try. It is artificial fibers, but quite acceptably real looking in natural light and a very close match to my own hair’s color, texture, and weight. Considering one wig made out of moss was found in Vindolanda, I figure it’s not the end of the world if someone spots it’s not human hair in close examination. 😉

Putting some stitches in place on the bottom side to hold hair in place.

Putting some stitches in place on the bottom side to hold hair in place.

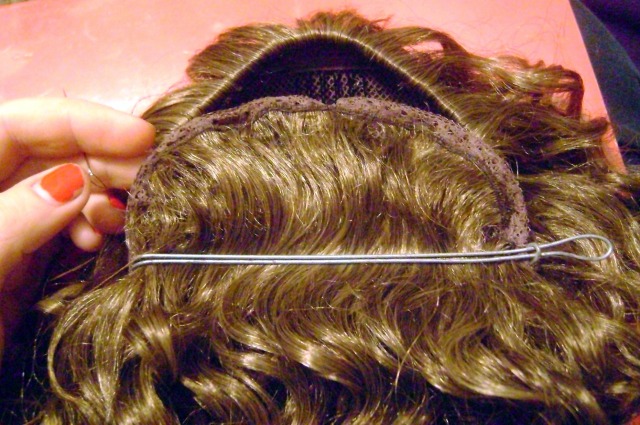
After getting it home, I removed the drawstring and tested out how I wanted to fold it. I settled for making the bottom half slightly smaller than the top half in order to puff out the top a bit and help the curls lie in a staggered formation. To keep the hair in place while I sewed, I improvised a clip out of wire and then removed it when the stitches were in. I put a row of tight stitches along the bottom half to keep the lower hair in place so it wouldn’t pull back and snarl between the hairpiece and my own hair while being worn.

Stitches in place along bottom edge of hairpiece (top of pic).

Stitches in place along bottom edge of hairpiece (top of pic).

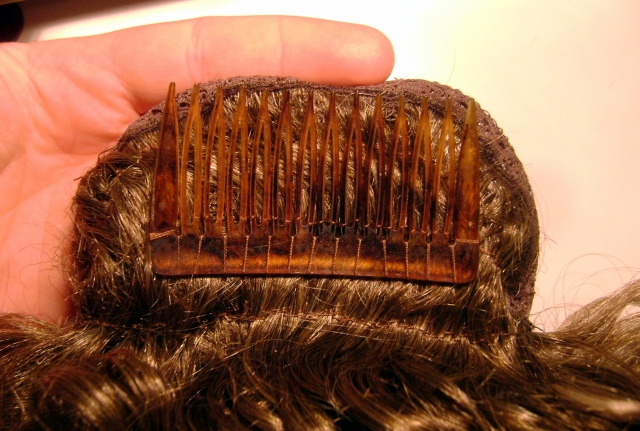
Here you can see the hairpiece opened up while I was putting the stitches in place to hold the bottom hair down. The hairpiece is flipped from our perspective here – the bottom of the picture shows the part that will be folded over and sewn to the top edge, creating a pouch that will be stuffed with a little padding. The hairpiece came with two small combs sewn inside; I left them in there since they weren’t in the way.

Comb sewn to underside edge.

Comb sewn to underside edge.

To attach the hairpiece to my head, I sewed a comb to the underside. I debated attaching it to a diadem or headband, but realized upon testing that this comb held it in place very well even when I was moving around a lot.

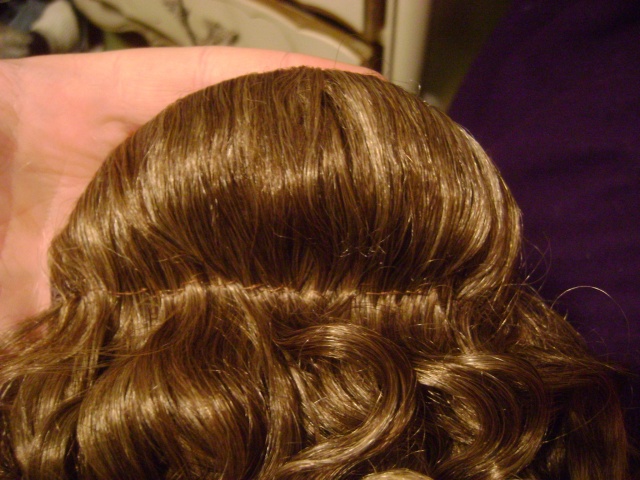
A line of stitches just behind where the curls start on the top side.

A line of stitches just behind where the curls start on the top side.

With the bottom side done, I turned my attention to the top. The hairstyle calls for a graceful sweep up to the top of the pile of curls. I knew that the curls would likely fall off to either side after being worn for a while, so I put a line of stitches in the top side too as I had done along the bottom.

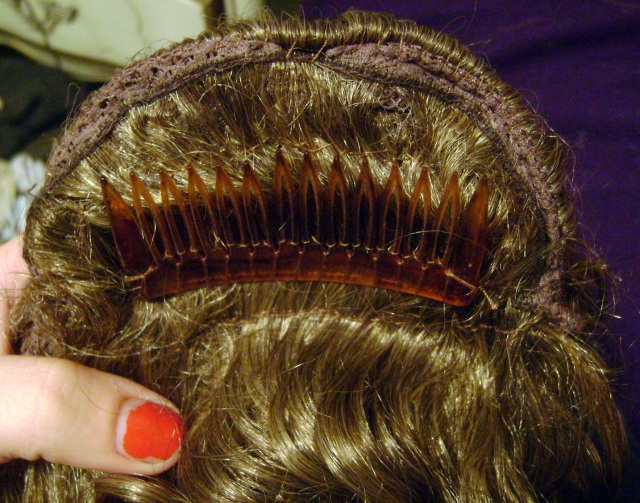
Underside of finished hairpiece.

Underside of finished hairpiece.

Now that the hair wasn’t going to flop around on me too much, I sewed up the sides of the hairpiece into a little pouch. I put some batting inside to give it volume, and in retrospect I think I put in too much or needed a stiffener along the bottom edge, since the underside rounded up a little and creates a visible gap between the hairpiece and my scalp at the back.

Finished hairpiece.

Finished hairpiece.

By this point it was pretty late at night, but I was too excited to wait till morning to try it out. Therefore, you’re all gonna be treated to some images of the fabulous 1970s wallpaper still hanging in my grandparents’ upstairs bathroom.
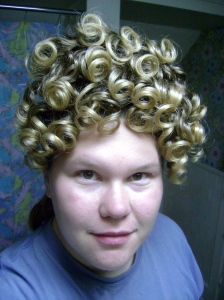
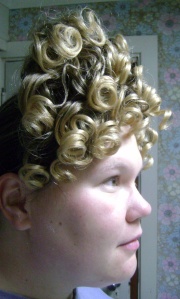
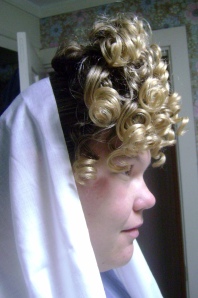
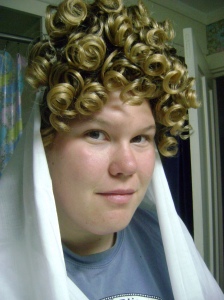
Front view. Side view.Overall, I’m delighted. It pops up a little bit in the back, but the general silhouette isn’t bad and the front view is great. I hope that the curls stay as crisp as they are now, but I found that twisting them around my finger generally put them back into place when necessary. The little info thing that came with the hairpiece says it can be handwashed and that the curls will spring back into place when it dries out again. I did try wearing my diadem on top of this but it didn’t sit right with the bump the hairpiece made.

Side view with palla.

Side view with palla.

Front view with palla.

Front view with palla.

With a palla on, the bump at the back isn’t a problem at all. In fact, it solves an issue I’ve been having – my palla tends to slide off my head when I’m out and about, and the small pad of batting gives me something I can stick a pin into and hold my palla exactly where I need it. This was a very simple project that I whipped out in one evening with such striking results.

I hope my impromptu tutorial helps nudge other folks into trying out authentic Roman hairstyles. This just goes to show that you don’t need any special skills as a hairdresser to achieve the right look, especially if you’re working with detachable hairpieces you can hold in your lap and sew into place. (And nobody yelps if you accidentally yank a few strands out.) Now that my own hair is growing out, the braided hairpiece I made is not as necessary. I can put my own hair into a simple braided bun and stick a few pins into it. With this hairpiece, I can go from a mundane braided ponytail to full-on Flavian glory in literally seconds. Go try it out!

Posted in Uncategorized | Tagged | Leave a comment

Elinor No More

With my transition away from Elizabethan England and towards Roman Gaul over the last few years, my SCA name of Elinor Strangewayes no longer really fits me. That, and I’ve come to the unavoidable conclusion that the name “Elinor” is currently about as popular in the SCA as the name “Raven” is at your local Ren Faire, or “Madison” at a daycare. Shout my first name, and you get half a dozen ladies named Elinor/Eleanor/Alianor in response. I’m ready for something else.

I wanted a name that reflected the time period and region of my current research: Romanized Gaul, circa 1st-2nd centuries. I’m intrigued by how local and invasive cultures intermingled. The Gauls typically used a given name and patronymic system (“Dave, son of Bob”) among themselves, sometimes adding a tribal affiliation if necessary. The Gauls became Romanized fairly quickly after the Gallic Wars ended, though, and their language and distinct naming practices vanish within a few hundred years. During that transition period, you see a hybrid mix of Roman cognomen (equivalent to our first names) and Gaulish patronymics.

That was the pattern I set out to copy: Pick a good Roman woman’s cognomen and a Gaulish man’s name for the patronymic. I live on a rural homestead, so Agricola seemed a good choice. It means “farmer” (we get “agriculture” from the same linguistic root).  A Julia Agricola was born in AD64 – on the early end of my preferred date range, but quite reasonable.

For the patronymic, I wanted to find a man’s name from one of the tribes of Eastern Gaul. My partner’s persona is a Romanized Germanic tribesman, so having my persona reflect an affiliation from one of the Gallo-Germanic boundary tribes would be good. (David Cuff wrote a fascinating PhD thesis on the families of Roman auxiliary soldiers, including their marriage practices.) There are a few tribes along that frontier: The Aedui, Sequani, Treveri, Mediomatrici, and Helvetii are among the most prominent. Our local Interlibrary Loan Department was able to get me a copy of David Ellis Evans’ book Gaulish Personal Names, which when combined with Joshua Whatmough’s Dialects of Ancient Gaul is practically the Bible for the subject.

During my search for a patronymic, I happened to be discussing the subject of Romanization one afternoon with a fellow Roman-persona friend. He asked if I had settled on a name yet, and when informed that I hadn’t, he immediately claimed me as a member of gens Julia. (Ironic, since Julia Agricola was one of the examples I was using to cite that cognomen!) I was initially skeptical of the idea, since I wasn’t sure there were period examples of a traditional Roman woman’s two-part name construction with a so obviously non-Roman name tacked on at the end as a third component. However, Karin Stüber’s article “Effects of language contact on Roman and Gaulish personal names” provided the breadcrumbs I needed to document a three-part name system by citing examples of Romano-Gaulish women’s names in that format in the Corpus Inscriptionum Latinarum: Iulia Bellorix Abrextubogi f[ilia] (CIL XIII.5665) and Iul(ia) Litumara Litavicci f[ilia] (CIL XIII.4711).

Iulia Litumara Litavicci filia translates as Julia Litumara, daughter of Litaviccus. (Patronymics take the father’s name in the genitive case.) Litaviccus was an Aeduan name  from the present day French regions of Saône-et-Loire, Côte-d’Or and Nièvre. One prominent leader of that name served in the Gallic Wars – the Aedui had initially supported Caesar against Vercingetorix, but switched sides as the war progressed. Litaviccus inflamed his countrymen’s anger against Rome by spreading rumors that the Romans were massacring the Aedui they captured. Caesar settled the affair by parading captured Aeduan nobles, proving they were still alive, and the Aeduan soldiers surrendered. Litaviccus escaped. I like the story, and the sound of the name, so Litaviccus is as good a patronymic as any. It’s a little early (the war leader dates from 50BC, and the CIL inscription appears to be undated) but I will give it a shot.

So my final result is this: Iulia Agricola Litavicci filia – Julia Agricola, daughter of Litaviccus. It’s a name that reflects a person living with one foot in Rome and the other in Gaul – Roman enough to have a gens affiliation and to be giving children Roman names, but still Gaulish enough to include the father’s name at the end… and an obviously Gaulish one at that!
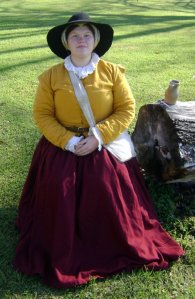
——————————————————

Cuff, David B. The auxilia in Roman Britain and the Two Germanies from Augustus to Caracalla: Family, Religion and “Romanization.” PhD Thesis, University of Toronto, 2010.

Evans, D. Ellis. Gaulish Personal Names: a Study of some Continental Celtic Formations. Oxford: Clarendon Press, 1967

Whatmough, Joshua. The dialects of ancient Gaul: prolegomena and records of the dialects. Cambridge: Harvard University Press, 1970.

Stüber, Karin. “Effects of language contact on Roman and Gaulish personal names,” in: Tristram, Hildegard L. C. (ed.), The Celtic languages in contact: papers from the workshop within the framework of the XIII International Congress of Celtic Studies, Bonn, 26-27 July 2007, Online: Universitätsverlag Potsdam, 2007. 81—92.


Posted in Uncategorized | Leave a comment

Glass fusing with mixed results

Last summer, I bartered with somebody for a cardboard box of glass shards from a stained glass studio. It’s a great variety of colors and sizes, and was labelled COE 96. (All glasses have a specific coefficient of expansion. That refers to how much they expand and contract when heated. You can’t mix different COEs or the project cracks. This will become relevant later on.) It’s been staring at me reproachfully ever since and begging to be used. I don’t know how to do stained glass (yet) but I do have a kiln capable of doing small glass projects. I usually use it for annealing beads, but it is a pretty flexible model. With all this free compatible glass laying around, I decided to try some fusing projects in hopes of working up to slumped and/or cast items.

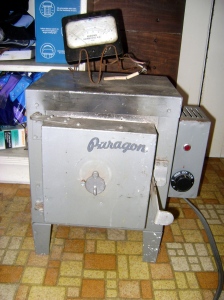
My ancient Paragon Q11A.

My ancient Paragon Q11A. It stands on a heatproof surface when in use; this pic was taken when it was cooled off and just on the floor out of the way.

What the Paragon website says a Paragon Q11A looks like.

What the Paragon website says a Paragon Q11A looks like.

The problem is that my kiln is a little… unorthodox. I inherited it from a friend. Its serial number plate says it’s a Paragon Q11A. I think it’s either a very early model or one that’s seen a lot of things in its life, because it’s nowhere near the spiff and sleek blue beauty on the Paragon website. It stands freely on its little legs, without the protective skirts of the newer models. Its controller is attached to the side like an afterthought, and the heat gauge is even sketchier. It consists of a thermocouple literally poked through a hole in the top. That said, it’s worked like a champ for all the years I’ve been lampworking. I’ve never had a problem using it to batch anneal glass beads.

Last night, I decided to try my hand at glass fusing for the very first time. I’ve seen it done a few times and read a bit about the technical aspects. With a box of free glass taking up space in my shop, it was time to give it a shot. I assembled a handful of small projects, a larger thin thing I hoped would make a nifty suncatcher, and half a dozen beads that had cracked on me (glow glass is very unforgiving) and were gonna be thrown out anyways. I dug up a suggested firing schedule for COE 96 glass and got going. My old beauty doesn’t have a programmable controller, so any firing schedule requires constant attention. My usual strategy is to take a dry-erase marker and put a dot of paint on the temperature I’m shooting for, so I can look up from whatever I’m doing every few minutes and check it without walking over.

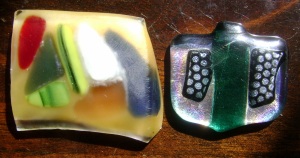
Finished projects. Lots of problems.

Finished projects. Lots of problems.

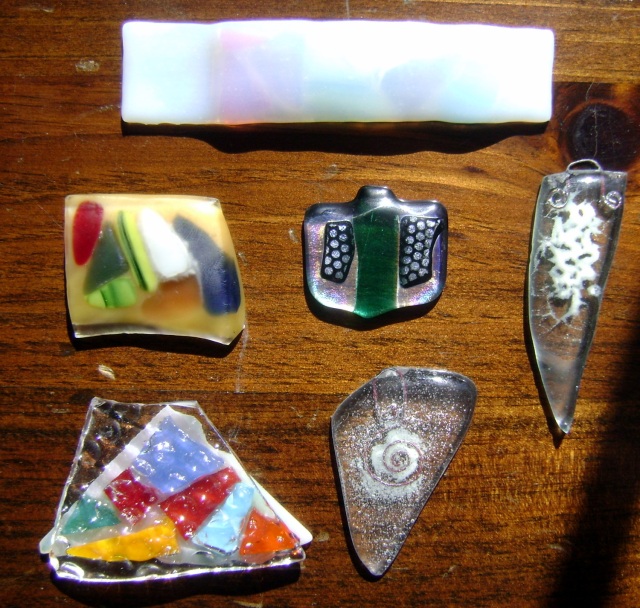
These are the small fusing projects. I don’t have any glass cutting equipment yet, so these were made by selecting glass that happened to be the right sizes. I knew they’d be a bit lumpy. A few came out great; the majority were disappointing. I swear to you that top bar had a layer of clear glass when it went into the kiln. I don’t know if it turned opaque from devitrification or just was a mystery glass that was supposed to do that, but it makes me sad.

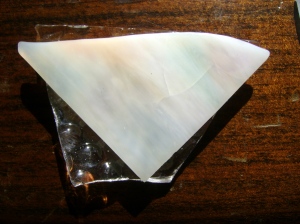
What was supposed to be the back side.

What was supposed to be the back side. The base layer was swirly clear and white.

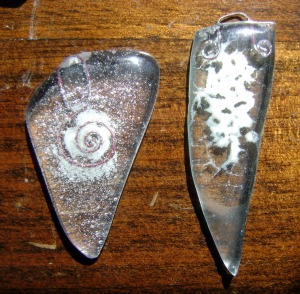
Pendants with glow glass powder. One spread out more than expected and swallowed its wire bail. Both seem to have cooked their glow powder, 'cause they don't glow.

Pendants with glow glass powder.

Clockwise, two pendants of clear with glow powder between the layers. I can’t use the glow powder well in lampworking because it tends to burn while being encased. That stuff is very temperamental – it’s hard to use because it makes the glass brittle and very thermal shocky. It also loses its glow ability if heated over a certain temperature (direct flame, for instance). One spread out more than expected and swallowed its wire bail. I used a bit of pure copper wire between the layers of glass. One was bent into a swooping spiral; the other plain. Both seem to have cooked their glow powder, ’cause they don’t glow. I really like the looks of that one on the right in particular, though, even without any glow in the dark capability, so it’s not a complete loss.

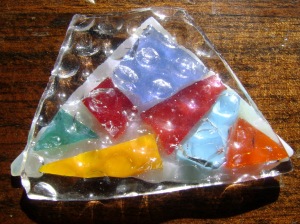
Front side. Serious incompatibility with light blue.

Front side. Serious incompatibility with light blue.

At the 7 o’clock position is a layer of white glass with shards of color and a bumpy top clear piece. I was really hoping this would be cool. As I said, I don’t have glass cutting gear, so I knew there’d be some overlap with that slightly too large clear top piece and I hoped it would look good anyways. For some reason this one didn’t heat enough and failed to slump all the way. Turns out to be a moot point, since the light blue chip inside it is clearly a different COE than the rest of it and has cracked all around.

Back side. Note the precise cracking around the light blue shard.

Back side.

This is the back side of that piece with the bumpy top. You can clearly see where that light blue adhered to the glass above and below it, but then when it cooled it proved to be more flexible (or less so) than those two layers, and so there are stress crack lines around it where something had to give. This can’t be saved. It’s probably going to crack completely eventually. Even remelting it won’t fix this. Sigh. At least the glass was free! Unfortunately, knowing now that there are mixed COEs in this box, I can’t comfortably use it for any more hot work since this problem could happen again at any project. Next skill to conquer: stained glass!
At 9 o’clock is a yellow base with some color and a clear top. It devitrified and looks hazy. Not a complete fail, but not what I was going for. I tried to flash vent the kiln to drop it quickly from the slumping temperature (~1400*F) down to a slightly cooler range, since sometimes glass will develop a crystalline structure if allowed to cool slowly. DSC09349 I’ve heard that most glass manufacturers have tweaked their recipes to avoid that problem, but clearly not the maker of this batch. I flash vented by turning off the heating element and cracking open the kiln, but it just didn’t drop fast enough. I think the fire brick holds a lot of heat. Even with the kiln off and the door open a few inches, it took long enough for the thermometer to drop just from 1400* to 1100* that I was starting to worry about cracking something and shut the door again. I don’t know if I wussed out or if that’s an actual issue with this kiln.  I’m happiest with the center piece: some iridescent clear over a strip of teal and two dichroic(?) or iridized black chips. That came out perfect.

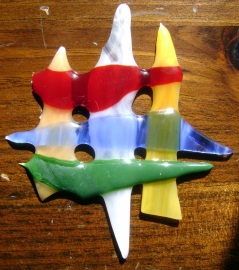
Suncatcher idea. Not enough glass made it get very sharp & pointy.

Not enough glass made it get very sharp & pointy.

The largest project was this random assortment of stacked shards. It wasn’t a failure, technically speaking, but not what I was hoping for. And at least this time, the error was purely mine. I didn’t stack enough glass layers (only one in most places) to avoid the ends from getting sharp as the glass relaxed and drew towards the center. I deliberately left holes between the shards so I could string wire and hang it in the sunlight. As I said – not a complete failure; it just doesn’t look like the image I had had in my head when I was putting it together. That’s an inexperience issue, not a technical problem. It’s still pretty and none of the glass cracked or devitrified, so that puts it ahead of the rest of the class. 😉

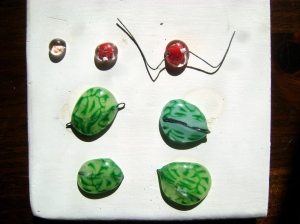
Last but not least, the arrangement of disposable cracked beads I put in there mostly out of curiosity. The bottom ones were glow in the dark Laurel medallions that had cracked before I figured out the appropriate annealing cycle for that material. I’d tried to slump them a little bit to heal their cracks but with no luck. So I put a loop of copper wire through their holes and decided to just flatten them out and see what happened. The wire is so I can still string it on something if I’d liked the effect.

Cracked beads.

Cracked beads.

That… was a mixed success. On the top left one, it worked okay. The bottom two spread out farther than their wire loops, and swallowed them into the glass. The top right one rejected the loop completely and spat it to the surface. Ha. The red ones were two beads containing Pennsic dust that had cracked, so I split them. The wire on the top right one can be removed, leaving it still an oddly shaped bead. The center is a perfect cabochon. Yay! Left side was a layer of encasing clear that had cracked off but still contained dust, so I slumped it anyways. It too made a neat cabochon.

So, verdict? The kiln worked more or less okay. My inexperience with the process led to at least one problem, probably more. But the real kicker is that random COE shard of blue. If there’s one non-COE96 piece in there, there’s probably more. So that rules out this entire box for hotworking projects. I can still use it for stained glass, but melting two different colors in contact with each other is asking for failure. Back to the project board!

Posted in Uncategorized | Tagged | 10 Comments

Wondrous Tidings

If you follow me on Facebook or were attending the recent Market Day at Birka (SCA) event, you’ve probably already heard: I was elevated to the Order of the Laurel for my glass beadmaking and research skills. This is the highest award the SCA has to offer for excellence in the arts and sciences. It was a very long and hectic day, and if I fail to mention any kindness you offered me during the event please understand it’s due to the fact everything was all a happy blur.

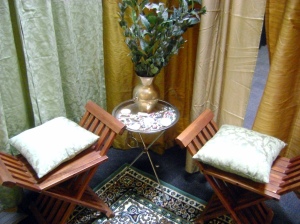
Vigil space.

Vigil space.

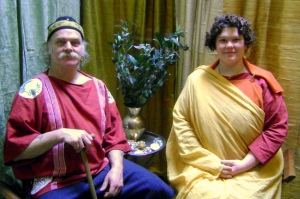
I was called into morning court on Saturday along with Ro Honig von Sommerfeldt, and the two of us were each sent off to our respective vigils. I was whisked off to a curtained off area near my merchanting booth. My Laurel, Mistress Bess Darnley, had coordinated my apprentice siblings and household members into various tasks. My former apprentice sibling (elevated before me) Master D’Unstable and current siblings Lady Pypa Ravenild,  Lady Mergriet Van Wijenhorst and Lord Díarmait Ó Bríain had set up a vigil space near my booth so I could both attend my vigil and also keep an eye on my shop. They outdid themselves. It was an elegantly appointed chamber under a skylight. Comfortable Roman-style chairs and pillar candles were around the room, as well as sprays of laurel in a brass pot. My apprentice sister Lady Mergriet had made strands of beads out of sugar paste and left them as a subtlety. She also made a wonderful selection of Roman dishes and served samples in little boxes. (The event site did not allow food to be openly served, but box lunches were okay.)

My partner Master Ekkehardt of Oakenwode and I pose in the vigil space.

My partner Master Ekkehardt of Oakenwode and I.

I had a constant stream of visitors for the first few hours. Some were people I knew; others were unknown to me. The advice ranged from brief expressions of congratulations to anecdotes and some deep philosophical conversations. I took advantage of the wonderfully pure clear light coming from the skylight to take a bunch of pictures during the quieter moments. The green and gold curtains made an elegant backdrop, and my household had created a number of heraldic banners to hang on the outside.

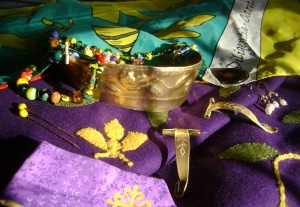
Gifts and regalia.

Gifts and regalia.

My Laureling was the very last item in the royal court docket, so my housemates and apprentice family had time to assemble at the back of the room. My friend Tiberivs Ivlivs Rvfvs had made a lovely silk banner with my heraldry, and my mistress’ son led the procession with it. My partner Master Ekkehardt of Oakenwode walked up with me, and behind us walked Mistress Bess Darnley and her husband Syr Yesungge Altan. Following them marched the co-leaders of my household, each holding parts of my regalia. The diadem was made by Lady Cornelia vandenBrugge, veil pins and earrings by Lady Konstantia Kaloethina, cloak by Mistress Bess Darnley, and fibulae by my own Master Ekkehardt.

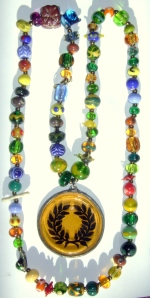
DSC09027 My Laurelling medallion has a legacy behind it – it is the same one given to my Laurel upon her elevation, and it’s strung on a chain of beads made by glassworking friends and students I have taught. There are a few non-glass ones in there – one is made of ceramic (made at a ceramics class and donated when she couldn’t find the glass bead she’d meant to offer) and another is a good luck charm of ivory. They’re all separated with little brass beads.

Syr Yesungge Altan spoke for me as a member of the Chivalry. Mistress Mirabel Belchere, who had been helping out all day covering my shop while I was in vigil, spoke for me as a Laurel. Mistress Aine Callaghan spoke movingly as a member of the Order of the Pelican. She was the one who taught me to use a glassworking torch years ago while I was in college and she was my closest SCAdian neighbor. We tried our hands at all sorts of projects from brass etching to wild-harvesting grapes and elderberries for jelly together. When she finished her speech, I think half the folks on the dais and more than a few members of the crowd were quietly sniffling. And I’d been holding it together up until then! 😉 Hlafdig Arastorm the Golden testified on behalf of the Ladies of the Rose afterwards, and her humor gave me a boost to get ahold of myself so I wouldn’t cry through the rest of the ceremony.

When Their Majesties asked if a member of the populace would speak, there was a moment’s silence – the gentleman who had been going to speak had been called out for a last minute errand! I had to laugh at the awkward pause. Another friend later came up to me and said that he didn’t know what the etiquette was for that situation, but that if anyone had been allowed to speak at that moment he would have vouched that anyone who could teach his wife to play with molten glass without burning down the building around herself was clearly doing it right. And I think that’s an awesome testimonial.

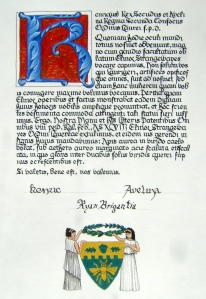
Scroll made by Mistress Caterina, text by my apprentice brother Diarmaid, and translated to Latin by Master Andrixos.

Scroll made by Mistress Caterina, text by my apprentice brother Diarmaid, and translated to Latin by Master Andrixos.

My scroll is simple and elegant – a lovely illuminated capital that shines with gold in the sunlight, and two classically-dressed women as supporters holding a Laurel wreath over my heraldry. The text was written in English by Díarmait, translated into Latin by Master Andrixos Seljukroctonis of Calontir, and put to paper by Mistress Caterina (whose last name I didn’t catch).

The ceremony was given one last happy touch when King Kenric asked my partner Master Ekkehardt to pause a moment before escorting me back down the hall. His Majesty spoke of Ekk’s long service to the Crown and to the armies of the East, and presented him with half a dozen silver coins as payment for his service. The coins were struck with Kenric’s likeness and are very nifty. Ekk is planning to get back into armor again after a hiatus of several years’ duration from a back injury, so this was a meaningful gift.

My Roman bling. ;)

My Roman bling. 😉

After my Laureling, it was right back to work as I now had to go take down my merchanting booth so the hall cleanup could begin. That didn’t stop me from getting this picture taken during a break in the work. Even in the terrible fluorescent lighting of the merchant area, it came out great. Once the booth was all broken down and back in the car, I discovered my household had made arrangements for an afterparty in the rooms we had booked. They had made marzipan leaves and decorated a cake, as well as a platter of beads made of marzipan. The room was packed.

Once the party started to wind down, I decided that as the newest Laurel of the East I was gonna go see what trouble my new medallion could get me into. Since this wasn’t a camping event where the parties are a lot more obvious, this proved harder than expected and I ended up in the big suite at the top of the hotel with a lot of nobles higher up on the food chain than myself. I chatted with a few of the folks there that I knew, but by then the excitement of the day was catching up with me and it was time for bed.

My deepest gratitude for all the friends who came together to make this day go so smoothly. I am overwhelmed by your generosity of time and talent.

Posted in Uncategorized | Leave a comment

Murrini challenges

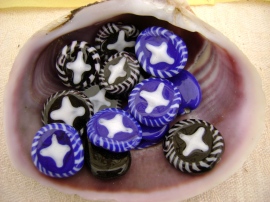
I play around a lot with mosaic cane. One of last year’s projects on the murrini/mosaic cane front was an attempt to recreate the Northern Army’s badge in glass. I pulled a decent cane for it, but I just never could get it to apply right. My guess is that the black I used isn’t opaque enough (it runs to a very deep clear-ish purple) and that the nippers I’m using to cut slices off the cane are not cutting it flat enough, so the face runs and distorts, even with a clear encasing. Sigh. I need to try this with “Intense Black” glass which is designed not to bleed out to dark clear purple.

I find making cane to be pretty challenging – not only do you have to think in the standard dimensions, but add the extra dimensions of time/heat balance and glass sag. To top it off, you’re doing it blind (the design gets covered as you make it) and sideways (you’re going to be pulling it like taffy and cutting off slices).

Three beads made with slices from that cane show the flaws in the pattern and different application tricks you can use for varying effects. The first one (the orange bead) is done traditionally, just applying the murrini slice to the surface of the molten bead and letting it melt flat. The downside to this is that you usually lose the detail of the design’s center, as seen. It’s recognizable, but the star is supposed to be the center charge and the white lines are just supposed to be embattlements. What happens is that the center pattern shrinks down into the bead as the base expands out while melting. This technique is period, and it’s used to make what’s referred to as the Viking “sunburst” murrini pattern. (Think the Imperial Japanese rising sun flag from World War II – a red core covered with red and white stripes will expand into this design when melted flat onto a bead. You can see other examples of sunburst murrini that I pulled for this bead strand.) It’s a flop when you’re trying to draw attention to the center of the murrini slice.

A modern glassworker’s trick to prevent this loss of center detail is to cap the slice with a dot of clear glass right after you stick it to the bead. This dot of clear glass melts in and protects the slice’s face, and also has the added benefit of serving as a lens to magnify the center design. Unfortunately, if the murrini slice is already starting to melt, or wasn’t cut straight enough, the face design warps. As seen here.

Northern and Boreal Army beads.

Northern and Boreal Army beads.

So yeah, I haven’t perfected the Northern Army badge murrini yet, but I feel confident I’ll get there. In the mean time, I’ve gotten around this temporary stumbling block by making Northern Army and Boreal Army beads that use a finely twisted stringer to recreate the embattlements along the border. I originally tried to make the embattlements with masked dots, but found that way too time consuming for not enough results. The star is applied white glass that is dragged out with a sharp tool to create the points. They aren’t heraldically perfect, but at least everyone who looks at them can tell what they’re supposed to be!

Posted in Uncategorized | Tagged , | Leave a comment

1st century Roman lady’s hair piece

I have this thing where I cut my hair off pretty much like clockwork every 5 years or so. I usually make that call right around the time when it’s 85*F, humid, and my hair’s tangling itself miraculously in the middle of the night. It grows really fast, so that means I usually have hair down to my hips by the time I am so sick of it I just need it all gone right now. That means, however, that I’m then stuck with anachronistically short hair for the next couple of years while it grows out. For my Elizabethan portrayal, that wasn’t an issue as I just wore forehead cloths under my coifs. No hair is supposed to be visible, ergo no problem if it’s buzzed short or dyed a funky color.

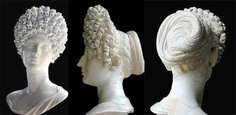
Three views of a Flavian lady.

Three views of a Flavian lady.

With Roman, though, I’ve got a problem. Roman women’s hair in the first century is elaborately coiffed and piled on top of the head, and only slightly covered by a veil. This style, called the orbis comarum by hair historian Janet Stephens, features a wreath of braids at the back of the head and a high fringe of curls at the front. The wreath could be a false hairpiece pinned over the wearer’s original hair. My hair is currently just below my ears in length. Fortunately, I’ve saved my long hair the last few times I’ve cut it short, so I’ve got several 12″+ long braids to work with. I followed Janet Stephens’ tutorial video on this hairstyle to make my false hairpiece.

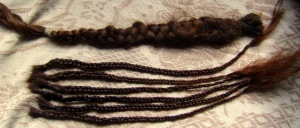
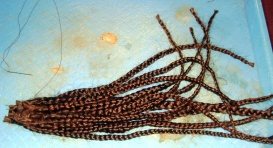
Top: half of the hair from one haircut. Bottom: 6 smaller braids made from the other large one.

Top: half of the hair from one haircut. Bottom: 6 smaller braids made from the other large one.

My hair is very thick (a ponytail tends to be about the diameter of my wrist) and so when I cut it a few years ago I divided it into two braids. For this project, each braid was then divided into six smaller braids giving me a total of twelve braids to work with, each about a foot long. The ends are stitched together with a needle and thread. To minimize frizz, I ran a small amount of Bag Balm (a lanolin salve) through the hair while I braided it. Once the ends were firmly secured, I then cut off the extra inch or so that was left outside the stitching.

Ends all stitched together before shaping.

Ends all stitched together before shaping. Displayed on a classy, classy recycled cafeteria tray.

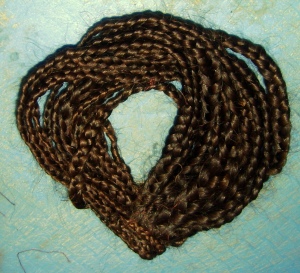
With 12 small braids completed, I layered them in 4 rows of 3 braids and staggered the ends to taper the finished product. Each braid was stitched to its neighbors. When all 12 were firmly attached to each other, I sewed the whole thing together repeatedly with anchoring stitches just to minimize the chances of it shifting around while being worn. I loosely twisted them into a circle shape and used the longest of the braids to wrap over the spot where the wreath joined. I put a handful of catch stitches throughout the wreath to keep the braids together once it’s being worn.

Finished wreath.

Finished wreath.

The finished wreath isn’t quite as tear-drop shaped as it appears in this picture. To finish off the look, the short real hair forward of my ears will be teased into rag curls. Hair behind the ears will be French braided and pulled together to be hidden under the wreath pinned in place on the back of my head. The final project to make this ready for wear is to get some hairpins done. I’ve seen a few really neat ones (such as these lovely poppy Roman hair ornaments). My goal is to have this hairstyle for Birka, a large SCA event in New Hampshire in January. I think I can do it. This has been a nifty challenge.

Posted in Uncategorized | Tagged , | 1 Comment

A&S Documentation: The Hadleigh Road Necklace

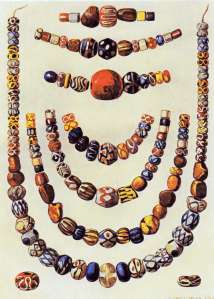
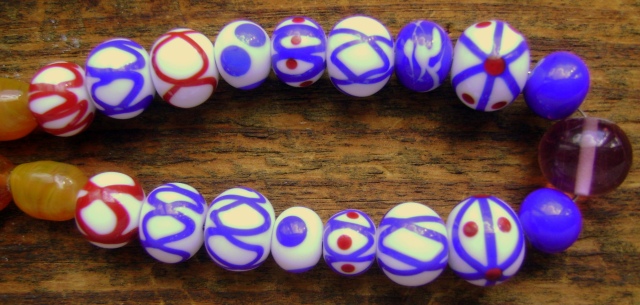
A selection of Anglo-Saxon beads from Hadleigh Road cemetery, Ipswich, UK.

Lady Elinor Strangewayes, OM. Shire of Mountain Freehold.
Materials: Glass beads, wire.
Date: 2nd – 7th century AD. One grave in the cemetery contained a Roman coin of Marcus Aurelius dating to 161 AD. The majority of these beads date between the 5th and 7th centuries.

Beads from Hadleigh Road cemetery, Ipswich. Image from Layard, N.F. 1909. “Anglo-Saxon Cemetery, Hadleigh Road, Ipswich,” Proceedings of the Suffolk Institute of Archaeology, Volume 13, pt 1, 1-20.

Beads from Hadleigh Road cemetery, Ipswich. Image from Layard, N.F. 1909. “Anglo-Saxon Cemetery, Hadleigh Road, Ipswich,” Proceedings of the Suffolk Institute of Archaeology, Volume 13, pt 1, 1-20.

My copy of the longest of the Hadleigh Road necklaces.

My copy of the longest of the Hadleigh Road necklaces.

The cemetery in which these beads were found was excavated in 1906-07.1 Unfortunately, the excavation was fairly haphazard (the leader of the expedition, Nina Layard, mentions that a large group of unemployed locals were set loose in one part of the field with shovels and told to find “relics” of interest) and so much of the beads’ provenance and context is missing. This strand is not especially accurate because it was assembled to 20th century aesthetics. Dr. Layard further notes that the beads’ original position on the strands was not recorded, that the artist chose to assemble the strands in such a way as to feature every bead pattern found, and that many amber beads were not included in the reconstruction. Original Anglo-Saxon necklaces are not symmetrical with one large center piece and bilateral symmetry up the strand. They tend to be more randomly strung, sometimes with one or two beads hung like charms from loops of wire.

I chose to recreate the longest of the strands presented by the Layard expedition artist because it is a good sample of a variety of bead patterns. My beads were made out of modern Effetre glass on a propane-fueled HotHead torch. In period, these would have been made over charcoal or wood fired beehive-shaped furnaces powered with bellows. I purchase my glass in rods produced in Italy. The beadmakers of the early Middle Ages also used a lot of Italian (Roman) origin glass, which was frequently of superior quality to locally produced material. When the Roman legions withdrew, European glassmakers had had to make do with the components on hand. One important ingredient in early glass was potash made from burnt Mediterranean seaweed. Once that was no longer available, the northern glasshouses began using potash made from burnt ferns which was significantly less pure.2 Anglo-Saxon and Norse beads are frequently unstable and prone to deterioration over time as the glass breaks down. That can be seen clearly in some of the original beads where the colored waves proved softer than the original glass and decomposed out.DSC09780

The majority of these bead patterns have been documented by bead scholars Birte Brugmann, Johan Callmer, and Margaret Guido in their works on Anglo-Saxon and Continental bead trade.3 The original recreated necklace had 4 amber beads and one of rock crystal or rose quartz, which I have recreated with glass. Clear or amber-colored glass beads are not unknown in the historical record. Red beads with white or yellow crossed waves are Guido classification 8xiv. The pattern was produced in multiple glasshouses in mainland Europe and came into England via Kent and the Thames estuary in the 6th and 7th centuries.4 White beads with blue waves were popular in the Rhineland, Netherlands, and northern France circa 550 – 650AD.5 Margaret Guido suggests that they were a bead style of limited popularity. In her classification tables, Guido labels the type 3iiia A glasshouse near Leiden in the Netherlands is known to have produced beads like this. In England, they are most often found in the southern counties though some have been discovered as far north as Yorkshire. White beads with red lines may represent a local variation on 3iiia possibly produced in Norfolk and Suffolk.

Center beads.

Center beads.

Of the large beads in the center, the white beads with red lines or blue lines are simply variants of the patterns discussed above. The white beads with crossed blue lines and red dots was popular in the Rhineland, northern France, and the Netherlands. The style came from glassworks near Leiden around 600AD. Many were imported into England, concentrated in the southern counties and as far north as Yorkshire. Margaret Guido calls this style type 3iiic.6 Other contemporary examples I’ve seen include a bead in a necklace found at Gotland and currently at the Swedish Historical Museum (artifact #454255. SHM 4689); also a 6th century Frankish necklace at the Metropolitan Museum, NY, accession number 17.193.45. The white beads with blue dots are uncommon, which is surprising given the simplicity of their pattern. A few have been found in Germany, possibly of Frankish origin. Margaret Guido’s opinion is that they are rare enough to make it difficult for an accurate date, but her theory is that they are of Rhineland origin and were imported into England between 500 and 650 AD.7 The large white beads with double crossed blue lines, a center blue line, and red dots on the intersections are new to me. The challenge in going with artistic representations versus primary sources is the uncertainty of the accuracy of the drawings. I have never seen this exact pattern before, but it doesn’t look jarringly out of place in an Anglo-Saxon context. They might be a variation on Guido type 3iiic (white beads with crossed blue lines and red dots), but I cannot find any other examples. The large bead in the center is of rose-colored Effetre glass, but the original was probably rock crystal or rose quartz.

My biggest challenge in this project was deliberately lowering the quality of my stringer work.8 The lines on the original beads are erratic and imprecise. Thanks to modern flame control technology and thousands of hours at the torch, my beads can be pretty precise replicas of each other. I had to carefully choose to make the stringer sloppy to capture the look of the originals. The other challenge was the size of the beads. It’s hard to tell the exact size of the originals since there was no scale on the drawings. I like to work on a fairly small scale, and some of these beads appear to be nutmeg-sized. I strung the beads on fine wire. In period wire or linen thread would have been appropriate. No trace of the original stringing medium was found in any of the graves excavated.

Overall, I had fun with this project. It’s the first time I’ve set out to copy a specific strand, and I think it came out pretty well.

—————————-

1Layard, N.F. 1909. “AngloSaxon Cemetery, Hadleigh Road, Ipswich,” Proceedings of the Suffolk Institute of Archaeology, Volume 13, pt 1, 1-20.

2Kidd, Kenneth E. 1979. Glass Bead-Making from the Middle Aegs to the Early 19th Century. Parks Canada: Ottawa, ON.

3Brugmann, Birte. Glass Beads from Early Anglo-Saxon Graves: A Study of the Provenance and Chronology of Glass Beads from Early Anglo-Saxon Graves, Based on Visual Examination. Oxford: Oxbow Books, 2004; Callmer, Johan. 1977. Trade Beads and Bead Trade in Scandinavia ca. 800 – 1000 AD. Acta Archaeologica Lundensia 4th Series, No. 11. Lund: Munksgaard; Guido, Margaret. 1978. The Glass Beads of the Prehistoric and Roman Periods in Britain and Ireland, Rep. Res. Comm. Soc. Antiq. Lond. 35, (London).

4Guido, Margaret. 1999. The Glass Beads of Anglo-Saxon England c. AD 400-700 (ed. Welch, M.) Rep. Res. Comm. Soc. Antiq. Lond. 56, (London). Page 63.

5Guido 1999: 32

6Guido 1999:32-33

7Guido 1999: 34

8Stringer is fine strands of glass used to make decorations or patterns on the beads in the flame.

Posted in A&S 50 Challenge, Project Documentation, Uncategorized | Tagged | 4 Comments

Changes in the wind

Gulf Wars, 2011

Gulf Wars, 2011

Last summer, I started noticing that when the thermometer got over 75*F or so, I was having a hard time functioning. Brain fog, fatigue, getting confused easily – and it was even worse when I was wearing my full Elizabethan clothing. This isn’t to say that the clothing itself was intolerably hot by default (I’ve been wearing it for years and thousands of others did so their entire lives) but that I was suddenly having problems with the heat where no such problems had existed before. I realized that the culprit was a medication I have to take every day. It’s not something I am willing to stop taking, so I decided I had to minimize my heat exposure during warm weather. That, sadly, meant giving up my beloved working class clothing of the late 16th century.

I agonized over this decision for a very long time, not the least of which was because I had no idea what time period to do next if the 16th century was out and all others had to be eyed suspiciously for heat index. None of the other SCA-period centuries really appealed to me. I do like the dorky hats of the Burgundians, but I’ve been less than impressed with how the rest of that era’s clothing looks on me. I look like a potato sack in Viking, and besides, the culture doesn’t resonate with me. I like the material culture of the Vikings – beads, obviously, but also the personal items and weaponry and the ships – but I’ve never made it through a saga without falling asleep. The culture just doesn’t feel like “home” to me.

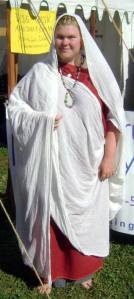
My new Roman kit, Pennsic 2013.

My new Roman kit, Pennsic 2013.

Finally, I decided to become a citizen of Rome. Some of the people I really respect in the SCA have been doing kick-ass Roman impressions for years, and they make it look good. The clothing is dead simple to make, cool and comfortable, and still looks elegant if draped correctly on any size or shape of body. I took Latin in college and studied a bit of Roman history there. A lot of the things I like most about my research in the 16th century still translate to this culture and period – there’s a heady mix of cultures swirling around across oceans, with all the fascinating pushback and compromising and appropriating that intrigues me.

The big stumbling block for me was finding the human faces out of those centuries of anonymous crowds. I have a hard time really feeling interested in a given culture or time period unless I can feel like I know its residents and have a sense of their daily life. It’s why I’m not that interested in prehistoric stuff all that much – there’s just too wide a gulf in what we know to be able to get the sense that they were everyday normal people. For me in the 16th century, I found that easily through the vast body of primary source material and all the Elizabethan-themed movies, books, TV shows it inspired. I really liked being able to read the firsthand words of some fishwife being called into court for slandering her neighbor, or hear a joke told 400 years ago and still find it funny. Most of my experience with Rome was of the sonorously formal “Gallia est omnis divisa in partes tres” type from Latin class and the stoic old white dudes in toga statues you see everywhere with pretensions to neoclassical culture.

It took two TV series, one fiction and one nonfiction, for me to dip my toes into the water and finally see living, vibrant Rome. I started by watching the HBO series Rome, which was a fun show. It was full of historical inaccuracies, but it made average Romans seem real and alive. I followed that up with Mary Beard’s Meet the Romans series on YouTube. It’s a wonderful romp through the graffiti and realities of everyday common Roman life. I highly recommend it. With those two series under my belt, I’d seen the faces in the crowd. Now I’ve moved on to primary source sculptures, frescoes, and paintings. I am excited to have a whole new world of research opportunities!

Posted in Uncategorized | Leave a comment

Tablets of Drinking Chocolate in the Spanish Style

Tablets of Drinking Chocolate in the Spanish Style

 To every 100 Cacaos, you must put two cods of the long red Pepper, of which I have spoken before, and are called, in the Indian Tongue, Chilparlagua; and in stead of those of the Indies, you may take those of Spaine; which are broadest, and least hot. One handfull of Annis-seed Orejuelas, which are otherwise called Vinacaxlidos: and two of the flowers, called Mechasuehil, if the Belly be bound. But in stead of this, in Spaine, we put in sixe Roses of Alexandria beat to Powder: One Cod of Campeche, or Logwood: Two Drams of Cinamon, Almons, and Hasle-Nuts, of each one Dozen: Of white Sugar, halfe a pound: Of Achiote, enough to give it the colour. And if you cannot have those things, which come from the Indies, you may make it with the rest.

  – Antonio Colmenero, trans. Don Diego de Vades-forte. “A Curious Treatise of the Nature and Quality of Chocolate.” Published in London in 1640, in Spain before 1631.

Redacted Ingredients:

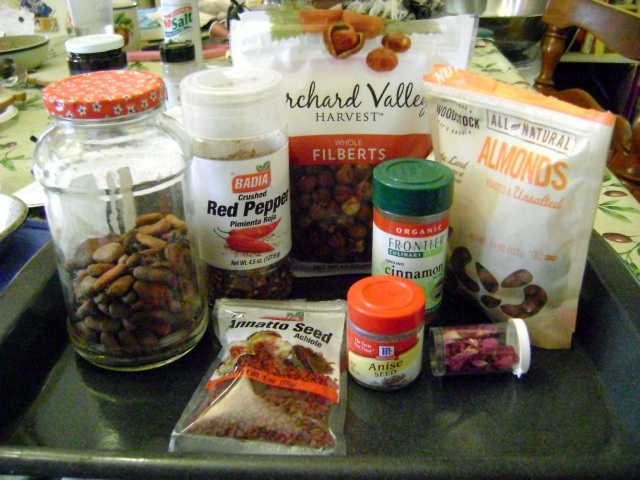
Cacao ingredients.

Cacao ingredients.

  • 100 cocoa beans
  • 2 cods red chili pepper (approximately 1/2 tsp)
  • 1 handful aniseed (quarter-sized mound in palm, powdered)
  • 2 mecaxóchitl flowers (a dash of pepper was substituted)
  • 2 drams cinnamon (1/2 tsp)
  • 12 drams almonds (~8 tsp)
  • 12 drams hazelnuts (~8 tsp)
  • 1 cup sugar

This recipe is a fascinating glimpse into Mesoamerican foodways (the hot pepper, the use of flowers as spices) and how those foodways were interpreted by the Spanish palate (thickening the drink with nuts, adding sugar).  Marcy Norton’s helpful article “Tasting Empire: Chocolate and the European Internalization of Mesoamerican Aesthetics[1]” explains that orejuelas is a Spanish translation of the Nahuatl words gueynacaztle (“great ear”) and xochinacaztli (“flowery ear”), two flowers that were used as spices. What Colmenero calls Mechasuehil is probably mecaxóchitl, which Norton describes as a relative of pepper with an anise-like taste. Since I had neither of these things “which [came] from the Indies,” I substituted some anise for approximate flavor. Colmenero says that Campeche tastes like fennel. I elected to leave fennel out, as I’m not fond of the licorice taste and there was already too much of it with the anise. Achiote (Bixa orellana, also known as annatto) gave the chocolate a reddish color and had a slightly “musky” flavor. Marcy Norton compares the taste to paprika or saffron.You can usually find achiote/annatto in the Hispanic section of your local larger grocery store. Cacao beans can be found online or in larger health food stores – it’s often sold in “nib” form (roughly crumbled) which will work fine for this recipe and means you can skip the shelling step.

Using JSTOR, there are references to “rose of Alexandria” or “rose of Castile” as possibly another term for hollyhock, but nothing (from what I found) placing this particular association solidly within the range of period. Nicholas Monardes mentions “Roses of Alexandria” as the Spanish Damascus Rose, which modern botanist Graham Stuart Thomas alleges has survived to the present as the Autumn Damask Rose (Rose Book 304). For this batch, I used the dried petals of my grandmother’s small-blossomed tea rose.

If you can’t find a given ingredient, it’s perfectly period to leave it out, as Colmenero points out: “And if you cannot have those things, which come from the Indies, you may make it with the rest.”

Process:

The Cacao, and the other Ingredients must be beaten in a Morter of Stone, or ground upon a broad stone, which the Indians call Metate, and is onely made for that use: But the first thing that is to be done, is to dry the Ingredients, all except the Achiote; with care that they may be beaten to powder, keeping them still in stirring, that they be not burnt, or become blacke; and if they be over-dried, they will be bitter, and lose their vertue. The Cinamon, and the long red Pepper are to be first beaten, with the Annis-seed; and then beate the Cacao, which you must beate by a little and little, till it be all powdred; and sometimes turn it round in the beating, that it may mixe the better: And every one of these Ingredients, must be beaten by it selfe; and then put all the Ingredients into the Vessell, where the Cacao is; which you must stirre together with a spoone, and then take out that Paste, and put it into the Morter, under which you must lay a little fire, after the Confection is made. But you must be very carefull, not to put more fire, than will warme it, that the unctuous part does not dry away. And you must also take care, to put in the Achiote in the beating; that it may the better take the colour. You must Searse all the Ingredients, but onely the Cacao; and if you take the shell from the Cacao, it is the better; and when you shall find it to be well beaten, and incorporated (which you shall know by the shortnesse of it) then with a spoone take up some of the Paste, which will be almost liquid; and so either make it into Tablets; or put it into Boxes, and when it is cold it will be hard. To make the Tablets, you must put a spoonefull of the paste upon a piece of paper, the Indians put it upon the leaf of a Planten-tree; where, being put into the shade, it growes hard; and then bowing the paper, the Tablet falls off, by reason of the fatnesse of the paste. But if you put it into any thing of earth, or wood, it sticks fast, and will nor come off, but with scraping, or breaking.

The first thing I do is put all my cocoa beans on a sheet pan in a warm oven. Heating them up loosens the papery shell (like a peanut skin) to the point where they can be peeled fairly easily by pinching between thumb and forefinger. I’ve done this recipe by hand in a mortar and pestle and by machinery with a food processor. Unless you’re feeling super frisky, use a food processor. This takes hours of pounding and your arm will fall off. Grind the cinnamon, anise, and chili peppers together. Grind cocoa beans to a fine powder, and add the first ingredients. Grind the nuts with a few spoonfuls of the cocoa beans, and add to the rest of the mix.

Finished cacao tablet. Not too great looking on its own, but the scent is AMAZING.

Finished cacao tablet. Not too great looking on its own, but the scent is AMAZING.

If I am doing this by hand, I will take a metate or heavy stone mortar and pestle at this point and pre-heat it in the oven. I get it about as hot as I can comfortably hold it with a dishtowel. Put your powdered ingredients into the hot mortar and pound/grind it until the oils express and the substance starts to liquify. Keep going for a while after that – the more oxygen gets into the mix, the better it will be. Pour the paste out onto wax paper. When cool, break into tablets and store in a box.

If you want to save time and arm muscles, use a food processor. Put the cacao bean and spice powder in a dish in the oven to get it warm all through, then add a few spoonfuls at a time into the processor. I use the grind or pulse setting. It will be disheartening at first because it looks like nothing is happening for the first few minutes. Stop the food processor and take a spoon to the bottom of the mixing container – by now you might have the first beginnings of a brown paste hiding under the blades. Mix that paste into the powder and turn the machine on again. Repeat this, adding more powder, until the mixture takes on an oily sheen and reaches the consistency of peanut butter. As it mixes, the cacao will oxidize and begin to smell like real chocolate.


Drinking Chocolate

There is another way to drinke Chocolate, which is cold; and it takes its name from the principall Ingredient, and is called Cacao; which they use at feasts, to refresh themselves; and it is made after this manner. The Chocolate being dissolved in water with the Molinet, take off the scumme, or crassy part, which riseth in greater quantity, when the Cacao is older, and more putrified. The scumme is laid aside by it selfe in a little dish; and then put sugar into that part, from whence you took the scumme; and powre it from on high into the scumme; and so drinke it cold.

– Antonio Colmenero, tran. Don Diego de Vades-forte. “A Curious Treatise of the Nature and Quality of Chocolate.” Published in London in 1640, in Spain before 1631.

Redaction:

Take a cup of water. Break off a piece of chocolate tablet (about 1 inch square, give or take). After heating the water, use a molinet if you have one (it’s a fancy wooden beating stick, still used in gourmet circles) or an egg whisk to beat the tablet into the water. Skim anything that floats to the surface and set aside. If necessary, add more sugar to the water; otherwise, pour the chocolate-water back into the foam. Serve cold.

Cocoa as we know it today has been treated with alkali to make it able to dissolve in water. This stuff, being untreated, will separate and float to the surface if you let it sit. It’s pretty gross looking – the oil is orange from the annatto and forms little bubbles in the brown liquid.

I’ve never had enough leftover to know how long it will store – it’s too tasty to sit around for long!


[1] The American Historical Review, Vol. 111, Issue 3.

Posted in Class Handouts, Project Documentation, Uncategorized | Leave a comment

Getting started in lampworking

Maybe you’ve taken an intro class or watched a friend do it, and now you’ve got the bug to melt some glass yourself. Lampworking is a great hobby in that most of the tools you need can be scavenged or created with a little ingenuity. Here, in no particular order, is a list of the stuff you need and some ideas on how to get it.

1. A torch. Don’t try a plumber’s torch or the like; they won’t work. Get one specifically marketed to lampworkers. I recommend the HotHead torch. It’s single fuel, affordable (~$40-50), and very forgiving. There are one or two other “beginner” torches out there in this price range, but they tend to break very quickly. My HotHeads have been my full time torches for 6 years now and still work fine. (I put the term “beginner” in quotes because a lot of lampworkers insist that the mixed gas torches are somehow more professional, but you can do a lot with a HotHead. The major drawback is that it doesn’t get as hot as a mixed gas torch and you don’t have as much control in changing the fuel/air ratio of the flame, which is necessary for to get the full effect of some of the specialty glasses.) In period, most beads were made with a charcoal-fuelled furnace or kiln.

2. Colored Safety Glasses. These are a must. You’re protecting your eyes not only from stray glass chips, but also from the high intensity UV and infrared light put off by the torch. A pair of standard safety glasses are okay if you’re sitting down at a torch for a few minutes a year (you’ll hurt your eyes more on a sunny day at the beach) but if this is something you are serious about, get a pair of didymium glasses or welding goggles. Didymium lenses are a specialty thing used in glassworking and metalworking to protect specifically from the radiation and light frequencies in a bright flame. Radiation-induced eye trauma used to be an occupational hazard of glassworkers – it even had a name: glassblower’s cataract. You can probably borrow a pair of welding goggles from a friend until you get your own, but make sure you get one of the lighter shades. The dark glass used for heavy welding is far too opaque for a lampworking torch, and you won’t be able to see what you’re doing!

3. Something to control your beads’ cooldown rate. I use a couple of pieces of ceramic fiber insulating blanket, but other folks swear by a crockpot full of vermiculite. The idea is to slow down your beads’ cooling rate to minimize the thermal shock. There are theories that in period basins filled with hot coals may have been placed in the back of the kiln or built into the side of the crucible, and hot beads were put there to cool as the heat source died. Ceramic fiber can sometimes be found inside old ovens, if you’re in a position to scavenge some. It’s cheaper and easier to buy some – you can get a couple feet for around $10. [EDIT: Ceramic fiber blanket is *not* the same as fiberglass! Make sure you’re getting the right stuff, or you’ll just have an itchy mess.]

4. Glass. Do yourself a favor and buy some glass to start with. If you want to play with recycled shards, that’s awesome, but it’s a steep learning curve. Modern bottle glass has been engineered for injection molding, meaning it is very stiff to work with and rehardens extremely quickly. It will waste a lot of your time, gas,  and patience to try to use it to learn upon. I recommend Effetre or Moretti glass (two names for the same thing). It’s commonly available and works well with the HotHead. Don’t get borosilicate glass or any of the fancy reducing glass while you’re just starting out – they won’t work on a HotHead torch.

5. Kiln wash/bead release. It’s a mix of clay & graphite or other materials, used to prevent glass from sticking to your mandrels. If you don’t use it, you’re making hatpins. This is something you’ll have to buy (or look up a recipe online and mix yourself, but you’ll still have to buy the ingredients). I highly recommend Dip-n-Go Sludge from Arrow Springs. Unfortunately, Arrow Springs is the only distributor as far as I know, and their shipping can be costly, but this is the best bead release out there in my experience. Other brands are prone to cracking (turning your bead into a hat pin) or being difficult to work with.

6. Mandrels. These are sold at lampworking supply places, but you’ll save yourself some money by befriending a welder. Stainless steel TIG welding wire makes *great* mandrels, and most welding shops will sell you a handful for less than you’d pay from a glass place. Just make sure they’re straight – a bent mandrel is a pain in the butt, because the beads won’t come off it.

7. Gas. The HotHead runs on straight MAPP gas or propane. MAPP burns hotter and cleaner than propane, but is much more expensive. I use the little Coleman-style propane tanks for travelling classes and a BBQ tank at home. You can hook up a BBQ tank to a HotHead with an off the shelf hose available at pretty much any place that sells grills or portable heaters. The only downside to those hoses is that they collect oil and dust from inside the big tanks, and over time the rubber lining will degrade and leech oil into your fuel gas. That will leave soot and gunk on your beads and ruin your fun. You need to drain the pressure from the line at the end of each beadmaking session, and ideally take it off the tank and hang it up overnight once a week or so to drain the oil that accumulates. Even then the hose will deteriorate over time. I recommend replacing it once a year. Alternately, if you have a welding supply place near you, you can purchase a few feet of T-rated hose which will handle propane without deteriorating. Despite these things to remember, bulk propane is cheaper than the little canisters and immensely cheaper than MAPP gas.

Other tools:

Bead reamer – gets the kiln wash out of the beads when done and smooths out any sharp edges; a tiny file will do this well. For real improv credit, a piece of rock will grind off a sharp bead end, too.

Marver – a flat or shaped surface used to manipulate beads into different shapes. Aluminum heat sinks from appliances work great for this. You can use the back side for a flat surface, and the grooved top for a texturing option.

Something to hold your dipped mandrels – I use a block of wood with holes in it to keep the mandrels from touching each other. I’ve seen folks use bowls full of sand as well. Whatever works for you.

Rod rest – something to hold the glass rods you’re about to use or have recently used, that will keep the hot ends from touching your work surface. A piece of scrap metal will work for this.

The Worksurface itself – I use a piece of plywood covered with a piece of thin sheet metal as my workstation. It has a metal bracket to hold the torch in place. The whole thing is portable and can be put in place with C-clamps.

A kiln is awesome but not necessary for most beads. For larger work, you will need a kiln to control the cooling rate and properly anneal the beads. If you have a friend with a kiln, you can batch anneal a lot of smaller beads at the same time.

Suppliers:
Arrow Springs used to have everything I needed, but they’ve stopped carrying Effetre glass in favor of their own custom mixes.
I’ve used Frantz Art Glass several times this year with great success. They have decent prices and their random discount bin can be entertaining. They occasionally have free shipping deals.
Mountain Glass Arts has a drool-worthy print catalog and a good selection of glass and tools as well.

Posted in Uncategorized | Tagged , | 5 Comments